Tuesday, November 10, 2009

Child-sized 'Snuggie' for Paige

Everytime that silly informercial comes on, Paige and Blake both say they want one. Now, both can be cold-natured and love snuggling up with blankets, so they actually might really use it.

However, I fear the 'one size fits all' mentality would be a bit harder to maneuver for a 7 year old. Plus, there's no cool patterns available. So using a variety of sources and patterns I found online, I made this one for Paige:


Here's a closeup of the top. The colors are just her style and it's sized nice and roomy for her.


Fleece doesn't fray, so there's no need to finish all edges, but I ran a small hem around the entire perimeter to give it a more finished look.


This is the fleece I'll be using to make Blake's 'Snuggie'. Lessons learned on the first - I think I'll reduce the space across the chest (between the sleeves) and a little bit of the sleeve length for his.

I hope they like them - and actually use them! Now to put them away to hide until Christmas :-)

Monday, November 9, 2009

Rainbow Cake

Have you seen this? I know it's been all over blogland, but I guess I'm late coming to the party.

Omnomicon's Rainbow Cake


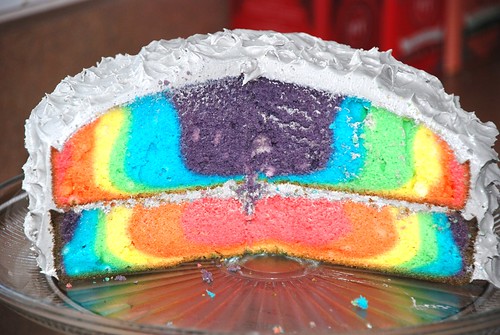
Once I showed it to Paige, she loved the bright colors and was anxious to try it. We used our own cake and frosting recipes, but followed the same 'method'.

Here it is 'in process':


She decided she wanted a Panda Bear cake, so I did the best I could on short notice. It's not near as elaborate as others I've made in the past, but she wasn't having a 'real' party anyway, so we made do. It was actually pretty neat - the plain black and white cake on the outside exploded with color once cut.

Excuse the messy photos - note to self: wipe crumbs and frosting from plate when taking blog photos... oh, and clean clutter off surrounding table...


It was yummy!

Baby Shower Goodies

I went to a lovely Baby Shower yesterday for the mom of one of my Girl Scouts. It was a lot of fun - it's been a while since I've been to a shower.
So, with dear hubby laid off from work, I needed to be as frugal as possible. I found some cute patterns online HERE and HERE and made some bib and bootie sets. The booties would have been cute with a coordinating embellished onesie as well, but the mom-to-be mentioned that she had lots of clothes already.
This first set is made from repurposed 'fabric' I had around the house. The backside of the bib and the outside sole of the booties are denim from old jeans. The khaki fabric was once a pair of cargo maternity pants, and the aqua stripe was a cute button-down shirt my son never wore and has outgrown.

This set was just a cute baby flannel that my momma passed on to me - so soft!


And then this one - it's cute on both sides. The doggy flannel came from my Mom and I had the red flannel from another project. This was my daughter's favorite set.

Oh, and the surprise of the shower... ever seen the relay game involving plungers, toilet paper rolls, and no hands? Way too much fun - I haven't laughed that hard in a long, long time.

Thursday, September 10, 2009

Another Furniture Re-Do

We were planning to move Paige into my recently-vacated Mother-in-Law's bedroom. We cleared out the room and painted it the same Vienna Turquoise that was in her existing room. She would move to this room (bigger closet and she loves the window seat) and we'd get Dean settled into her old room. Well... one major 'mistake' on her part later and she no longer gets the priviledge of changing rooms. She can stay where she is and we'll move Dean into this room.


During all of this, we discovered that both her large desk and large dresser will not fit well into the layout of this room - there's one small wall between the door and the closet and neither her bed, dresser or desk would fit there - meaning all three of those large items would have to crowd onto one side of the room.


I was on the hunt for a more narrow dresser and found this one on Craigslist:


It wasn't very pretty, but I liked the 'girly' lines to the top edge and the legs. So I removed the hardware, sanded and painted a nice chocolate brown (so hip with the turquoise these days!) I headed out after the painting was all done to get new hardware (just planned to use the existing holes) only to discover that the old hardware was a very non-standard size (2" hole spacing). I could not find any new handles at all to fit. Mark suggested I fill and sand the existing holes, but that would mean repainting AGAIN and I just wasn't up for that.


So I picked up some flat wooden plaques from the craft store, painted the edges brown and ModPodged some pretty decorative paper to them and used those to cover up the holes. Drilled some new holes and found some knobs I already had from an old dresser (just needed to spray paint them) and it was done!


So it's up in the new room (now Dean's room) and isn't very masculine... but maybe Paige will inherit it some day...


I've linked this over at The Shabby Nest's Frugal Friday Linky Party and The Shabby Chic Cottage's Trasformation Thursday! Go check out some of the amazing projects!

Birthdays

We just had Paige's Birthday a few weeks ago. I was looking back over several years worth of pictures and love the chronicle of time the birthday pictures show. I also love LOVE love making their cakes. I thought about, at one time, selling cakes; but the 'right' way to do it involves having your home kitchen inspected and certified 'commercial' before you can get a license to sell. Way too much trouble... so I just do it for fun.

Some years I really went all out with the cake, matching favors and goody bags, etc. Some years there just wasn't time.
I know we should be looking at Paige, but somehow I'm missing her 3rd and 7th BDay pics and need to find them before I post hers.
So, Blake's 1st Birthday was just family and a small baseball-decorated smash cake for him. No digital pics - maybe I'll scan them in soon. His 2nd Birthday was the first 'big' one with friends. It was a firetruck theme.


Blake's 3rd Birthday was at Chuck E. Cheese's and was all about Spongebob Squarepants.


Blake's 4th Birthday was just a small 'party' at his daycare - but they didn't allow home-baked goods so it had to be a store-bough Dinosaur cake that year.


Blake's 5th Birthday was Teenage Mutant Ninja Turtles - I forgot to get a head-on picture of the cake though.


His 6th Birthday was at Pump-It-Up (bounce houses and obstacle courses) and had a Star Wars theme. The boy loves him some TOYS on his cake :-)


And his 7th Birthday. I'll be honest here - I was 7 months pregnant and really just 'phoned in' this cake. The party was on a Friday night and I'd worked all day and just really didn't have time to decorate it like I wanted to. The party was a 'Night at the Museum' theme as I took him and his friends to see the 2nd movie and then have a sleepover. The cake just has two little toys from the movie and uses one of the lines "Dum Dum - Give me Gum Gum". Blake didn't seem to mind.


It's so neat to see how he's grown and changed over the years. He's a real sweetheart and will still cuddle with me almost anytime I ask. He's got a real sensitive side to him although he can be a real tough guy when his friends are around.

Tuesday, September 8, 2009

Furniture Makeover

I know I previewed that cute little cabinet a few weeks back and have yet to show the 'after'. I'm not completely happy with it and am still putting some thought into it.

So, here's another more recent project.

I bought two of these simple chairs on Craigslist super cheap ($5 each) - didn't really know yet what I wanted to do with them and they're just not as comfortable as I was hoping... but for $5 I'm sure we can find some use for them.

So this is the first one. I'm horrible at this - I hate sanding. So I go the 'quick and dirty' route and hope it holds up. I simply wiped this down with a wet rag, primed and spray painted. No repairs or sanding at all on the frame. So... it's far from perfect but it is cute.

For the seat, I removed all of the cane (?) and was left with an outer wooden frame. I stapled a quick woven 4-strap upholstery webbing base, added padding, and stapled fabric over the whole thing. I wished I'd used more padding and may redo it, but I'll have to buy more staples first :-)

The fabric, batting and paint I already had on hand. I did buy the upholstery webbing but still have some leftover. Total cost - under $10.

BEFORE:


AFTER:

So this is what happens...

when you leave your camera unattended....
It always makes me laugh when I download all the pics from my camera (I'm lazy and don't do it as often as I should) and I find some pictures I know *I* didn't take. Paige got her own digital camera for Christmas last year, but the kiddos always seem to find my camera if I leave it laying around instead of putting it on my desk like I should.

So a couple weeks ago I was painting the third bedroom for Paige to move in there. Since then, there's been some misbehavior and she is now NOT going to move in there...but I'll save that for another post.

I had just recovered the window seat custion in a fuzzy turquoise fabric and the room was pretty empty otherwise - wonderful play time, right? So first there's this... I believe this is Blake in a... um... pillowcase?


THEN I see this one... first question is...

Is that a 'gang sign' of some sort? Where did Blake get that from and does he think it's cool?

Then... I notice Paige's face (I'll hold here for your laughter :-)


Classic. Maybe I should leave my camera laying around more often, eh?